- Software Home
- Forum
- INRIA gForge
- Mailing Lists
- Bug Tracker
- Research Project
- IRC : #openvibe on irc.freenode.net
- Project Leader : Anatole Lécuyer, INRIA (anatole dot lecuyer at irisa dot fr)
- Lead Software Engineer : Yann Renard, INRIA (yann dot renard at irisa dot fr)
- This documentation is licenced under CC-BY-SA

Steady-State Visual-Evoked Potentials
Principle :
Steady-State Visual-Evoked Potential is a brain response induced by a visual stimulus, flickering at a constant frequency between approximatively 6 and 100Hz. The response manifests itself as an increase of amplitude of the stimulated frequency.
This scenario will illustrate a typical SSVEP experiment. In a few steps you will be able to test a SSVEP-based BCI. These steps are:
- experiment configuration
- training data acquisition
- classifier training
- online test
In addition to this documentation, each of the scenarios is commented and provides some additional information.
Protocol :
1st step: Configuration
Scenario to use : ssvep-bci-1-ssvep-configuration
In the configuration scenario you will find two configurable boxes.
Peripheral Settings
First, you have to input information about your hardware into the Peripheral Settings box. Currently there is only one setting available:
- Display Refresh Rate : This setting must match the refresh rate of the screen connected to the computer running the stimulator. This refresh rate will determine which frequencies will be usable for the experiment. We recommend using a standard 60Hz LCD screen.
Important : A word about the stimulation frequencies
SSVEP-based BCI experiments need to reproduce a flickering stimulus at a constant frequency. In OpenViBE, we use the computer screen as the flickering device. Thus, a flickering object (or "target") is represented by a shape which changes color at a constant frequency.
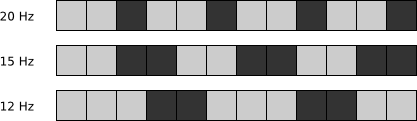
In order for the SSVEP to work, this change of color must occur at precise intervals. It is thus necessary to redraw the targets in a synchronized way with the screen. This means, that the frequencies which can be achieved depend on the refresh rate of the screen. In practice, only frequencies which are entire divisions of the screen's base refresh rate will be possible to achieve. (e.g.: On a screen with refresh rate of 60Hz, displaying of frequencies of 30, 20, 15, 12, 10 and lower will be possible. On a 50Hz screen, you will be able to use 25, 16.66, 12.5, 10 and lower frequencies)
The following picture illustrates the representation of several frequencies on a 60Hz screen:
Experiment Settings
Once you have configured your peripherals, you can use the next box called Experiment Settings to configure your SSVEP experiment. Several settings are available:
- Target Light Color and Target Dark Color : As described previously, the flickering of the targets is achieved by switching between two colors. The names Light and Dark were selected arbitrarily and you can choose any colors you like. In order to achieve better SSVEP response try to choose contrasting colors (such as red and black), by default the scenario uses red and dark gray.
Default values :
- Target Light Color : 100,0,0
- Target Dark Color : 10,10,10
- Target Light Color : 100,0,0
- Stimulation Frequencies : A semicolon-separated list of frequencies to be used during the stimulation. The scenario which comes with OpenViBE only uses three stimulation frequencies, however if you modify the processing chain manually you will be able to use more frequencies.
The frequencies are to be inserted as float values. Be precise (a frequency corresponding to 50/3 is better written as 16.6666 rather than 16.6), the stimulator will use these values to automatically calculate the number of frames necessary to represent the frequency according to your screen refresh rate and will raise errors if any of the frequencies is impossible to achieve.
- Default value : 20;15;12
- Processing Epoch Duration : The processing of the EEG signal consists of slicing it into periods of time and then extracting amplitudes of brainwaves in each of the stimulated frequency bands. This parameter determines the length of each slice in seconds. The longer the epoch, the better the detection and the longer the lag.
- Default value : 0.5
- Processing Epoch Interval : The speed (in seconds) at which will be the slices captured. A smaller interval will provide a more fluid control, a lower one will make the control more precise.
- Default value : 0.1
- Processing Frequency Tolerance : As mentioned above, the processing chain will search for increased activity around the stimulated frequencies. This parameter determines the width of the searched bands. (e.g: a tolerance of 0.250 Hz means that the program will consider frequencies from 19.75 to 20.25 Hz to determine whether the 20 Hz frequency was stimulated)
- Default value : 0.250
Hint: Once you have configured your experiment you can save your settings as a box configuration file for later re-use. A file containing the default settings is provided in the SSVEP scenario folder.
Once you are satisfied with your configuration just press play. The scenario will create necessary configuration files and will stop itself automatically.
2nd step: Training
Scenario to use : ssvep-bci-2-training-acquisition
After configuring the scenario you can proceed to the training phase. The SSVEP scenarios use Common Spatial Pattern (CSP) spatial filter to select the best characteristics automatically. This means that you can place the electrodes on any part of the scalp in the occipital area. Good results were measured with electrodes Oz, O1, O2, CPz, POz and Iz.
After launching the training scenario you will be presented by a window showing (by default) three squares - Training Targets. One additional square is added to represent no-stimulation. This square will not flicker at any time of the experiment. Once the scenario is started, a window will appear, you will then have to press the space to launch the training.

Experimental Protocol
During the experience periods of stimulation (when the targets will flicker, each at its predefined frequency) will repeat with break periods (no flickering) in between. Before each stimulation period one of the squares will be marked by a yellow arrow. The subject must then focus his visual attention at the marked square for the whole stimulation period.
Each square will be marked several times during the whole experiment. At the end of the procedure a file containing an annotated EEG signal will be produced. This file is saved (by default) in the OPENVIBE_FOLDER/dist/share/openvibe-scenarios/signals folder.
The experiment is already configured for three frequencies, each of them will be stimulated eight times. If you wish you can configure the scenario by modifying settings in the SSVEP Training Controller box. The settings are as follows:
- Goal sequence : Indexes of squares to be marked separated by spaces. Note that the square number 0 never flickers. Thus if you have defined three stimulation frequencies you will have to use indexes 0, 1, 2 and 3. The non-flickering target is used to define a level when the subject does not want to use any command.
- Default value : 0 2 3 1 2 1 0 3 1 2 3 0 2 0 3 1 0 3 1 2 3 0 1 2 1 3 2 0 3 2 0 1
- Stimulation duration : Duration (in seconds) of the stimulation period.
- Default value : 7.0
- Break duration : Duration (in seconds) of the break period.
- Default value : 4.0
- Flickering delay : Time (in seconds) between the appearance of the arrow marking the square to stimulate and the beginning of the flickering.
- Default value : 1.0
- Training Target Size : The size of the target. The size is given as a proportion to the viewport's size. Thus a size of 0.5;0.1 will mean that the target will be a rectangle with a width equal to a half of the viewport's width and height equal to 1/10 of the viewport's height. The viewport - the area used for display - is the largest square which fits the window, this means that a target with same width and height ratio will always be a square.
- Default value : 0.3;0.3
- Training Targets' Positions : Positions of the middles of the targets. There are N+1 targets, considering N as the number of frequencies. The first one is the blank target mentioned before. Positions are noted as relative offsets to the middle of the viewport. A position 0.0;0.0 thus represents the middle of the viewport. Position 1.0;1.0 its top right corner and -1.0;-1.0 the bottom left.
- Default value : (0.0;0.0);(0.0;0.5);(-0.5;0.0);(0.5;0.0)
A configuration file with the default settings is available in the SSVEP scenarios folder as well.
Once the training session is finished, the stimulation application will close itself automatically and the scenario will stop. If you quit the stimulator at any moment (by pressing ESC) the scenario will stop as well.
Classifier Training
Once you have acquired the training data you can use the training scenarios to create classifiers necessary for online testing.
First Scenario to use : ssvep-bci-3-CSP-training
First you will need to run the CSP training to generate the best characteristics from the acquired signals.
You will have to load the EEG data recording from the training acquisition step into the Generic file reader box.
Second Scenario to use : ssvep-bci-4-classifier-training
This scenario will create the final classifiers for online testing. One classifier configuration will be created for each frequency. At the end, the scenario will provide results of a K-fold cross validation test.
You will have to load the EEG data recording from the training acquisition step into the Generic file reader box.
Step 3: Online Evaluation
Scenario to use : ssvep-bci-5-online-shooter
The final scenario consists of a simple shooter game. The subject will control a "ship" represented by two wings (flickering squares at the sides) and a cannon (a flickering triangle on the top). By looking at each of the shapes the user can issue three commands.
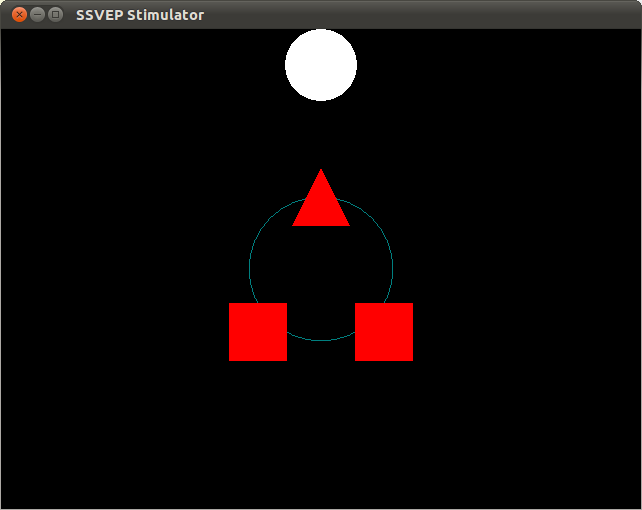
- Left Wing : Turn ship clockwise
- Right Wing : Turn ship counter-clockwise
- Cannon : Shoot!
The goal of the game is to shoot each of the appearing targets. A new target will appear when the one on screen is destroyed.
You can modify some parameters of the game in the SSVEP Shooter Controller box.
- Target sequence : The positions in which the targets will appear. There are eight possible positions, numbered from 0 to 7.
- Default value : 0 3 5 7 2 6 4 1
- Ship Angular Speed : The angle (in radians) by which the ship will rotate every time it receives a command.
Once the scenario is started, a window will appear, you will then have to press the space key to start the game. When the game is finished, the stimulation application will close itself automatically and the scenario will stop. If you quit the stimulator at any moment (by pressing ESC) the scenario will stop as well.
| Back to top | Generated on Wed Aug 10 2011 18:57:48 for Documentation by  1.7.1 1.7.1 |