- Software Home
- Forum
- INRIA gForge
- Mailing Lists
- Bug Tracker
- Research Project
- IRC : #openvibe on irc.freenode.net
- Project Leader : Anatole Lécuyer, INRIA (anatole dot lecuyer at irisa dot fr)
- Lead Software Engineer : Yann Renard, INRIA (yann dot renard at irisa dot fr)
- This documentation is licenced under CC-BY-SA

OpenViBE Acquisition Server
- NB: Document based on OpenViBE 0.9.0 (dec-2010).
Introduction
OpenViBE Acquisition Server is a tool designed to communicate with hardware signal acquisition devices and forward acquired signals and other experiment information to OpenViBE applications in a way compliant with the OpenViBE format specification.
The acquisition server doesn't communicate directly with acquisition devices. Instead, it provides the user with a set of drivers to choose from, each one being dedicated to a given device model. New devices can be supported by the server by developing new drivers. See Tutorial: creating a new driver for the acquisition server for details on this.
Configuration
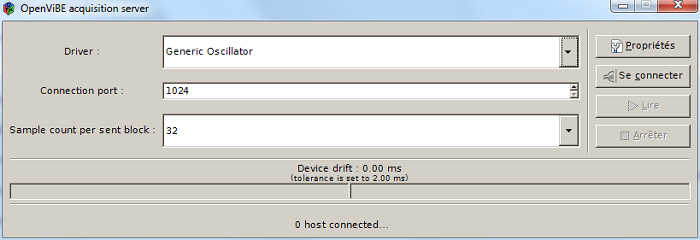
Let's have a look at the graphical interface of the acquisition server tool to present what parameters must be configured before it can be used to acquire and forward data. The server GUI should look like the following :
Acquisition Device Drivers
A list of available drivers is accessible under 'drivers'. Depending on your distribution of OpenViBE, a number of drivers may already be at hand. However, at least one driver should be available : the Generic Oscillator. Contrary to most drivers, this one doesn't connect to any hardware device, but generates sinusoidal signals. It is appropriate for testing purposes. To change the default driver presented when launching the Acquisition Server, add the following token to your configuration file :
Drift Monitoring
The Acquisition Server monitors the behaviour of the driver in order to ensure that it actually sends the number of samples it should, regarding the theorical sampling frequency of the device. When a drift is detected, you will see a progress bar going on the left or right (not enough or too much samples). When the drift reaches a threshold, an automatic correction is done : the Acquisition Server removes or duplicates some samples, and sends a stimulation to any acquisition client connected, so you can know in the signal that a correction just occured. The drift threshold can be modified in the configuration file :
# set the drift tolerance to 5 seconds :
AcquisitionServer_DriftToleranceDuration = 5
Connection Settings
In order to use a driver, connection details should be set so that the server communicates with connected OpenViBE applications as desired. The port to which to send data can be changed under 'Connection Port' (e.g. 1024 is a standard default setting). An OpenViBE application will then have to fetch data from this port once an experiment is started. Also, the size of the buffers sent to connected applications may be configured under 'Sample count per sent block'. This defines how many samples should be sent per acquired channel in a single buffer. Valid values are powers-of-two and 32 is the default. The duration or 'epoch' a buffer corresponds to depends on the sampling frequency, which may be set in the Driver Properties dialog (see Driver Properties)
Driver Properties
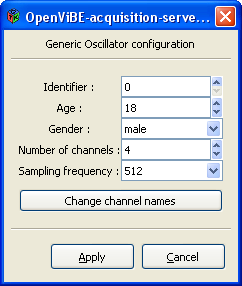
Once a driver is selected from the drop-down list and before it can be used, its settings should be configured appropriately. Settings provide information about the experiment being conducted and the subject undergoing the experiment. The 'Properties' button pops up the settings dialog of the currently selected driver. It displays settings that can't be retrieved from the hardware and that have to be filled up by the user. They may vary between drivers. For example, the Generic Oscillator settings include information about the subject (identifier, age, gender) and the experiment (number of channels to be acquired, sampling frequency, channel names).
Usage
Once a device driver has been selected and relevant settings configured, data acquisition can start. The server should first connect to the acquisition device, which is done by clicking the 'Connect' button. A label will inform the user whether the connection was successful, and the number of connected clients will also be indicated.
If the connection was established and the desired client(s) successfully connected, data sampling can be started/stopped by clicking 'Play'/'Stop'. Once one is done using a given device, one can disconnect from it by clicking 'Disconnect'.
| Back to top | Generated on Wed Apr 6 2011 10:00:00 for Documentation by  1.7.1 1.7.1 |